Showing posts with label or. Show all posts

Tuesday, October 25, 2016

Prevent access to specific partition or drive

Sometimes we would like to prevent users from accessing tons of data. we can do this by hiding the drive but it does not prevent the access completely. This trick will not hide the drive but users cannot access it. After preventing access, you can hide the drive to ensure full protection. To do this, perform the following steps:-

  • Log into the account where you want the users not to access the drive.
  • Open registry editor.
  • Go to HKEY_CURRENT_USER >> Software >> Microsoft >> Windows >> CurrentVersion >> Policies >> Explorer.
  • Right-click to create a new DWORD value with the name NoViewOnDrive.
  • Double-Click on this entry, Select the radio button named Decimal.
  • In the value data field put the value of the drive you want to prevent access.
  • The value is calculated using the formula 2n-1, where n is the number of the drive which you want to prevent access-1 for A, 2 for B, 3 for C and so on...
  • If you need to hide more than one drive, add the respective drive numbers and enter it into the value data field. For example, to hide drive C you need to enter 4 (2 3-1); to hide drives D and E you need to enter 24 (2 4-1 +2 5-1).
  • To apply the change to all users in the system, follow the same method, but use the key HKEY_LOCAL_MACHINE >> Software >> Microsoft >> Windows >> CurrentVersion >> Policies >> Explorer instead.
  • To remove all restrictions, just delete the entry.
  • To hide the drive click here.
Read More..

Tuesday, September 6, 2016

How to Copy or Hide a File inside an Image

Have a secret file and want to hide it on your system from other users? Here is a simple but cool trick that will enable you to hide a file in an image. The trick is so cool that you won’t be able to find out if the image is hiding a file behind it or not.

The jpeg image will not only look like usual image file but also work like one. The image will not only hide the document but also open in the Picture Viewer as usual. Great isn’t it?

Steps to hide files behind an Image:
  1. Create a new folder (I created in drive C: named “a”).
  2. Place all the documents/files in it that you want to hide (I stored z.txt in it).
  3. Copy any image of yours in it (I stored x.jpg in it).
  4. Make a rar archive of all the files that you need to hide (I created one named z.rar).
  5. Now open cmd (Start->Run->cmd)
  6. Go to the folder’s location by typing cd location like for me it was cd C:a
  7. Now just type the following command with name that corresponds to your file

Hide a File inside an Image

copy /b x.jpg + z.rar x.jpg

 Hide a File inside an Image

The screen will look like as shown above.

Steps to see/recover file back:

Just rename the final image to rar that is x.jpg to x.rar

The archive will be having your file
Read More..

Sunday, September 4, 2016

How to remove New Folder exe Virus manually or using software

New Folder.exe Virus
New Folder.exe virus mostly spread through the USB drive. It cannot be deleted normally. Here are the steps to remove this virus easily
  1. Find out all the locations of the “newfolder.exe” virus.
  2. Open the task manager and end the newfolder.exe process running in background.
  3. Open cmd and then type “dir /a XXX” where XXX is the name of the folder where the virus is.
  4. Then type “cd XXX”.
  5. Delete the file by typing “del name_of_file”.
  6. Then remove the whole folder by typing “rmdir /s XXX”.
  7. The virus has been removed just see the task manager once again and end the newfolder.exe process running in the background (if any).
  8. Restart the system.
There is also a software utility available for this purpose. Click to download
Run this software in safe mode to remove the virus easily.
Read More..

Sunday, July 31, 2016

Forest tree or wood carvings image collection

forest wood craving 1 forest wood craving 2 forest wood craving 3

forest wood craving 4 forest wood craving 5 forest wood craving 6

forest wood craving 7 forest wood craving 8 forest wood craving 9

forest wood craving 10 forest wood craving 11 forest wood craving 12

forest wood craving 13
Read More..

Sunday, July 24, 2016

How to recover any file from corrupted or broken HDs SSDs or SD cards


A couple weeks ago, I lost a Raspberry Pi SD card to corruption that didnt even have backup superblocks to restore. There seemed to be nothing to do about it since I couldnt mount it. Restoring the system wasnt a big deal. However, I really wanted some of the cpp, h, js, php, sh, and other files that I had changed a good bit but hadnt yet backed up or committed. Sure we all back up and/or use git/svn but we have to remember Murphys Law.

This is a guide on how to easily recover those files that you really want but hadnt backed up.

Needed packages

To do this, we are going to use scalpel, xxd, diff, and grep (So we are most definitely using Linux)

You will already most likely have xxd, diff, and grep on your system. To install scalpel, run:
sudo apt-get install scalpel
or yum or pacman or whatever package manager you use.

**Note: It is probably a good idea to make an image of the drive and use scalpel on that if you are able.

Editing Scalpel configuration

The default scalpel configuration file is located at /etc/scalpel.conf
All you need to do is comment out the file types you dont care about and add the filetypes you do care about that arent in there.
To create custom scalpel configurations, we will use a little bit of common sense and xxd as a hex dumper.
Find a different file with the same file type or an older copy of the file you want and run the following command:
xxd -l 0x04 filename.type; xxd -s -0x04 filename.type

This will get the first 4 and last 4 bytes of the file. Which should be enough to make the filetype unique, though you can change this as needed. You should see a pattern with a lot of files.
For instance, my sh files (the ones I wrote) often start with #!/b and end with sac. or fi..
and my cpp files often start with #inc or // and end with }.
Now we will take these hex patterns, reformat them as x?? and put them into the scalpel.conf.
You should use REVERSE whenever the file may continue multiple instances of the end statement. You may also need to increase the file size from 50000 to something much bigger for larger files.

Here are some of my custom scalpel configurations:

php         y        50000    x3cx3fx70x68x70        x3fx3e REVERSE
js y 50000 x3cx73x63x72x69x70x74x20x74x79x70x65x3dx22x74x65x78x74x2fx6ax61x76x61x73x63x72x69x70x74x22x3e x3cx2fx73x63x72x69x70x74x3e 
cpp        y        50000   x23x69x6ex63              x7dx2e  REVERSE      
cpp        y        50000   x2fx2fx20                      x7dx2e             REVERSE
h            y        50000   x23x69x66x6e              x64x69x66 REVERSE
sh           y        50000   x23x21x2fx62              x73x61x63 REVERSE


Running Scalpel

Once your scalpel configuration is finished, you need to start extracting the files. This will probably take a while and will get a lot of files (multiple copies of each that match on your system). It wont know the filename or newest version but we will look at that later. You can run scalpel with the following command:
scalpel -c /etc/scalpel.conf yourcopy.img -o output
or the following if you didnt make a copy of your HDD (you will have to specify the appropriate drive and partition number).
scalpel -c /etc/scalpel.conf /dev/sdx# -o output

Once everything is finished it will be in the output folder and we can look for the newest version of your file.

Finding your files

cd into the output directory and you can see all the different filetypes organized.
cd output; ls
For all your graphical file types, i.e. videos and pictures, they should all be listed there and you will have to rename them. 
For your other files, we can use grep recursively to find our newest version. This unfortunately requires you to remember things. It is a good idea to use a function or variable name that you used in order to find your files. Ex:
grep -R "playing()" ./
Searches for the function playing in all your files, this could give you matches in js, php, cpp, c, or h files.
grep -R "::CurlWriter" ./cpp*
Searches for the definition of CurlWriter in all of the cpp files
grep -R "VoiceCommand" ./h*
Searches for the variable or function VoiceCommand in all of your header (h files)

These will probably give you a couple of different results. In my case, these were all different versions of my file. This is a really good chance to use diff. All you have to do is select two of the files and diff to see the differences. Ex:
diff ./sh-5-1/00135386.sh ./sh-5-1/00135393.sh

Once you start getting used to this, you will be better about searching for the newest function or variable name you remember. Once you narrow it down to the newest copy of your file, you can move it elsewhere.
Ex:
mv ./sh-5-1/00135393.sh ~/ImportantFile.sh


There it is, this should allow you to recover almost any file you have created from a corrupted or bad HD, SSD, or SD card.

Places you can find me
Read More..

Thursday, July 7, 2016

How to extract or get email id from orkut

This is a very simple trick to extract email ID of any orkut user. This Works even if the target is not your friend. Below are the steps to do this:

Steps:-
  • Navigate to the profile page of the member you wish to know the email address.
  • Add that person as a friend.
  • Now navigate to your friends page.
  • On the right hand side, you will find a option to export contacts.
  • Choose Export Contacts Option.

extract or get email id from orkut

  • Fill in the Word Verification on the Next Page.
  • You will be prompted to download the contacts.csv file.
  • Once you have downloaded the file, open it in Microsoft Excel or any other compatible software.
  • You will see all the email addresses including those which have not yet accepted your friend requests but have recieved your friend request.
Read the comment portion for Sudhirs contribution
Read More..

Wednesday, July 6, 2016

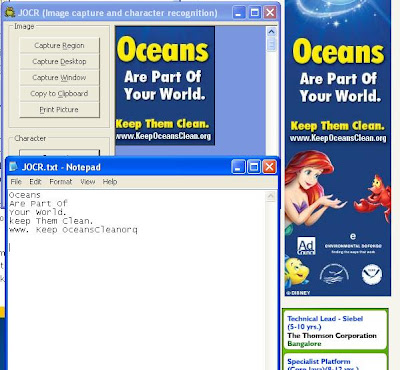
How to Copy Text from Images or protected web pages


Have you ever encountered a situation whereby you would like to copy the text or character from image files or protected webpage but unable to do it? Instead of typing the text manually by referring to the image or protected webpage, now with this simple yet powerful software utility named as JOCR, it allows users to copy text from any image files or protected webpage by utilizing OCR (Optical Character Recognition) technology so that it can be turned into useful character for further processing.

JOCR is a freeware and is pretty easy to use. In order to copy text from any image or protected webpage, you must use JOCR to capture the image or webpage. The image captured will be displayed immediately on the JOCR screen, then you can click on ‘Recognizer’ button to copy the text from the image file. Some of the text supported by JOCR include Chinese, Czech, Danish, Dutch, English, Finnish, French, German, Greek, Hungarian, Italian, Japanese, Korean, Norwegian, Polish, Portuguese, Russian, Spanish, Swedish and Turkish.

The minimum pre-requisite of JOCR is Microsoft Office 2003 or higher version, and you must have Microsoft Office Document Imaging (MODI) installed in order for it to work correctly. If you think JOCR is useful, do get a free download here.
Read More..

Thursday, June 30, 2016

USB device is not detected or is malfunctioning

Pen Drive USB Device
It’s not easy to troubleshoot a USB device, since they are usually plug-n-play devices. If your OS is Windows XP, it’s very easy to install and begin using a USB device; Windows XP has its own native drivers. But if your drive is not detectable, then the issue is probably hardware related. You could try the following steps to solve this issue:
  1. Sometimes the problem is solved by simply unplugging it and plugging it back firmly. It can be a case of loose connection.
  2. Try restarting your computer with the drive plugged into the USB port.
  3. Some times there is a voltage drop across the USB port which also can be responsible for the problem. Simply wait for few minutes it will be detected automatically.
  4. If all these attempts are useless, go to the "Device Manager"- Right click on my computer icon desktop and click on "Manage >> Device Manager".
    • Expand the Universal Serial Bus Controller List.
    • You can see an exclamation mark. Right-click on it and then click on "Uninstall".
    • Now, Right-click on "Universal Serial Bus Controller" and click on scan for hardware changes. Now your USB device must be detected.
If all these attempts have not solved your problem, then probably you device is malfunctioning.
Visit microsoft help for more. Click here.
Read More..

Sunday, June 19, 2016

Using Youtube on the Raspberry Pi without XBMC or gnash

There is an update to this here.

You can install this by pulling the source from git and running the InstallAUISuite.sh file.
Commands to install are below (your user should have sudo priveledges but you dont need to sudo or be root to run the commands unless shown otherwise):

sudo apt-get install git-core
git clone git://github.com/StevenHickson/PiAUISuite.git
cd PiAUISuite/Install/
./InstallAUISuite.sh

Update Instructions 

cd PiAUISuite
git pull
cd Install
sudo ./UpdateAUISuite.sh


Demonstration:


So this is a quick video to demonstrate youtube working fast and easily on the Raspberry Pi without the use of XBMC or gnash.
I tried out gnash first which didnt work at all.
So then I tried out XBMC and although it is pretty, it is awfully slow so I decided to get youtube to work on my own.
The basis of this is really simple. There is a nifty program out there called youtube-dl that can get the media file from the website and download it. Its great because it does it fast and works for many other websites like the daily show and the colbert report.
So what I did was basically write a little script that analyzes your input and then gets the proper information from the youtube-dl program without downloading the video, then it sends this http stream to omxplayer to play.
It can handle playlists or individual files from multiple websites as well as a bunch of other things.

After that, I started implementing a nice little search feature using C++ and Curl.
Im starting to implement a GUI which will essentially look like youtube kind of. Until then I have this nifty search tool, which was essentially my start to the GUI I am currently creating.

If youve ever used XBMCs youtube, you will notice that this is a lot faster, and in my opinion, easier to use and more natural. Plus it only requires a tiny file on your system as opposed to XBMCs massive footprint.

The nice part of having an easy command line program like this is that it can be incorporated into a lot of other things easily. For instance, I have incorporated it into my voicecommand script as shown in the video.

The source code can be found here. To install see the top.

Sources:
This post for using axel with the youtube-dl.
This page for the youtube-dl source and documentation.

 Consider donating to further my tinkering


Places you can find me
Read More..

Saturday, June 4, 2016

How to Turn On or Enable Hibernation in Windows 7

Note Windows 7 doesnt support Hibernate on System with Ram of 4GB or more.

To Turn On or Enable Hibernation.
  1. Click on Start.
  2. Type cmd. Now instead of pressing Enter, press Ctrl+Shift+Enter to run cmd with administrator rights.
  3. or Browse to C:WindowsSystem32
  4. Right Click on cmd.exe and select Run as Administrator
  5. Type powercfg /hibernate on and hit enter.
  6. Now go to Control Panel >> System and Security >> Power Options.
  7. Click on Change plan settings link of the active power plan.
  8. Click on Change advanced power settings link.
  9. Expand the Sleep tree.
  10. In the drop down box of Allow Hybrid Sleep, select Off as new setting to disable and turn off Hybrid Sleep.

To Turn off or Disable Hibernate.
  1. Click on Start.
  2. Type cmd. Now instead of pressing Enter, press Ctrl+Shift+Enter to run cmd with administrator rights.
  3. or Browse to C:WindowsSystem32
  4. Right Click on cmd.exe and select Run as Administrator
  5. Type powercfg /hibernate off and hit enter.

Now, to Set the power button option as Hibernate,

  • Click on Start.
  • Right-Click on the Power Button.

Enable Hibernate in Windows 7
  • Click on Properties.
  • Drop-down the Power Button Action Box.

Enable Hibernate in Windows 7
  • Select Hibernate.
  • Click on Apply and then Click on OK.
Read More..

Tuesday, March 22, 2016

How to Connect a Laptop or Personal Computer to TV

Read More..

Friday, February 5, 2016

How to enable Press Ctrl Alt Del Secure Logon On Windows 7 or Vista

HP 2009M 20-Inch HD LCD Monitor
Method 1: User Accounts Advanced Settings

  1. Click start and type netplwiz into Start Search box, it opens the User accounts dialogbox.
  2. Go to Advanced Tab.
  3. Under “Secure logon” section, select and check the checkbox for Require users to press Ctrl+Alt+Delete option
  4. Click apply and OK.
Method 2: Registry editing.
  1. Click start and type netplwiz into Start Search box, it opens Registry editor.
  2. Navigate to the following registry key:HKEY_LOCAL_MACHINESoftwareMicrosoftWindowsCurrentVersionPoliciesSystem
  3. In the right pane, double click on DisableCAD registry key value, and set its value data to 0

Method 3: Using Group policy.
  1. Click on Start button, and type secpol.msc into Start Search box, and hit Enter to open the Local Security Policy Editor.
  2. Navigate to Security Settings >> Local Policies >> Security Options.
  3. In the right pane, double click on Interactive logon: Do not require CTRL+ALT+DEL.
  4. Select and set the radio button of Disabled.
  5. Click Apply and OK.
Read More..

Friday, April 18, 2014

Free internet on Grammen Phone GP Unlimited download and browsing in computer or PC with any software


Hello everybody. The Grammen phone is a largest telecommunication company in Bangladesh. In the Bangladesh Grammen phone or other telecommunication company take cost for internet very
high price. As a result, we can not carry easily the internet cost. This is a great problem in our country. Don’t worry, every problem has a solution. Now I am sharing how to use give internet on Grammen phone (GP).

Today I will share give internet on GP about simple server software. This is the use of give internet. Today I will give you a trick about GP give internet. Today I will discuss about simple server software.
Follow these steps for using GP give internet.

Step-1: At first connect your modem or Nokia Pc suite in the under APN setting.

Step-2: Now get simple server Modified by Akash.rar file. Click here to get simple server Modified by Akash. This software need to extract. You can use software winrar or 7 zip for extract this software. If you have no any software for extract software. You can get from here. 
Just click here and get winrar.exe.

Step-3: Now run as administrator “SimpleServer By Akash” this. A cmd window will be open and take some time for loading text. Wait about 3-4 minutes for loading text. When you will see that the text do not take loading, you can minimize it.
Step-4: Now open your internet browser Firefox and complete Proxy setting use of under review.

HTTP Proxy: 127.0.0.1
Port: 8080

Step-5: Then open your internet get manager (IDM) and complete details to follow these settings.

HTTP Proxy: 127.0.0.1
Port: 8080

Just HTTP & HTTPS  option in IDM.

That’s it. Now enjoy unlimited use give GP internet on your PC with all software. Even Skype.

>>>>>>>>>>>>>>>>>>>ENJOY<<<<<<<<<<<<<<<<<<
Read More..
 
Copyright 2009 Information Blog
Powered By Blogger